Table of Contents
- Surface Displacement Modeling
Hexagon brings a “new dimension” to 3D modeling by adding the possibility to sculpt your object in a natural way, a bit like a sculptor would do using clay. It is possible to create cavities, humps, and to add very fine details using brushes with predefined patterns, enabling you to reach results which are much more realistic than using traditional 3D modeling techniques.
All the displacement modeling features are based on an important concept: multi-resolution smoothing.
This technique is independent from the basic structure of the 3D mesh which is the support of displacement modeling. It is entirely possible to model, for example, an animal or a human head from a simple sphere! The user is “emancipated” from a complex model to reach a complex result.
However, although the use itself of the displacement modeling tools is pretty simple and obvious, there are some issues to keep in mind in order to get a quality result. These issues are mainly linked to the concepts behind displacement modeling, as well as to the way to work.
Before starting any modeling process which involves displacement tools, it is important to consider several points:
It is first necessary to understand how the displacement works, and its relationship with mesh density and with the smoothing concept.
Displacement tools base themselves on a mesh, which to the tools will modify, according to several parameters. The less compact the mesh will be, the less detailed the deformations will be. To increase the precision of the displacement sculpture, it is necessary to increase the density of the mesh, so its smoothing range, or level.
Locally, the smoothing operation basically consists of subdividing a polygon into four smaller polygons. It is performed on the entire surface of the model, and thus smoothes the object. Once the object is smoothed, the displacement tools are going to act on a denser mesh, so the result will be more precise.
Increasing the smoothing range more and more will increase the density of the mesh and thus the precision of the displacement tools.

Above is an example, illustrating a displacement modeling operation with a default brush and a predefined pattern on a simple grid. From left to right:
The last image to the right shows that a high smoothing range enables far more precise details.
It is recommended to always start with a global shape, which will be refined as it is modeled. It is important not to start with small details and to come back afterwards on more rough modifications.
For example, we will avoid starting sculpting veins on an arm if we have to sculpt the muscles. It is of course better to do on the other way.
The method is way similar to the “Box modeling” technique, which consists in starting with a cube, which will be refined along the modeling process to get a more and more detailed shape.
For performances issues, some “micro-details” do not necessarily need to be modeled. It is absolutely possible to “cheat” using a bump texture. For example, it would not be necessary to model the skin grain, except maybe for extremely close-up views. So before starting to highly smooth your model, consider what must be modeled with geometry and what can be simulated with bump.
The polygonal structure which will be used as support to the displacement modeling is very important. Even if you do not have to worry about the topology while sculpting with brushes, the polygon arrangement can have a significant impact.
Basically, displacement tools push and pull the polygons of the smoothed object, at the highest level of geometry. There is no local creation of additional polygons. Just working with highly subdivided surfaces will allow you to create more and more fine details.
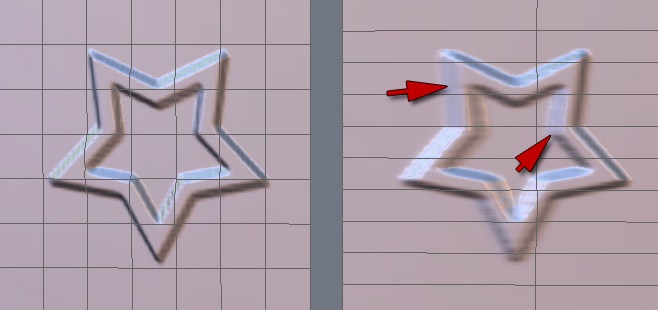
Thus if the base polygons are not really “square”, but rather rectangular or even stretched, the displacement deformations could produce faulty results.
Below is an example of a brush used on two grids: the first one only has square cells, since the second one has rectangular cells. You can notice the difference of results between both.

Of course, this issue will be exactly the same on models that are more complex than the simple grids above.
As this point, making sure that you have a control mesh that is already dense, uniform and precise enough will help you to avoid having to smooth the model too heavily in order to sculpt it in a very detailed way.
Finally, brushes can be used on triangles, quadrangles or n-sided polygons (also called “n-gons”). Choose however if possible quadrangles, in order to get better quality results.
To conclude, try to keep in mind the following three important rules:
This expression hides a powerful feature: the geometry displacement is dynamically stored at each level of smoothing. It means that when using displacement tools at one level of smoothing, displacements performed at higher levels are kept. And what's even better is they are naturally affected by modifications performed at lower levels. In other words, you can sculpt details working at a high level of smoothing, and then modify the more global aspect of the shape, working at a lower level, while keeping your details and having them follow your global displacements!
It is best to illustrate this concept through an example. Let's take the example of an arm to be modeled with muscles, veins and prominent sinews:
To sculpt the base, e.g. the global shape of the muscles, we will work with a low smoothing range. Since there are few details to handle, the modeling is performed on a global shape.
Then, we add a smoothing range, which lets us refine the shape of the muscle, to furrow/spade it more precisely and add details and definition to the shape.
To continue, it will be possible to add very fine details, such as veins or prominent tendons under the skin. For this step, we need a lot of polygons to work with acuteness and detail. We thus need to add one or two (maybe more) smoothing ranges.
Should we see any global shape issue on the model, it is still possible, thanks to the multi-resolution smoothing, to work back on a less detailed level of the object, such as in our case the smoothing level in which the muscle has been modeled. Then, with the appropriate tools, we can modify the global shape as wanted. If we go back to the highest level of smoothing, the one where veins and tendons have been sculpted, we will see that they have been kept unchanged. They even followed the global deformation of the muscle!
So keep in mind this concept of working at different level of smoothing, from a rough shape to a detailed one. You will always have the possibility to go back to modify a more global aspect of your shape, without loosing the fine details you will have modeled at a higher level of smoothing.
One small note: modifying the shape at a low level of smoothing very significantly will have an impact on higher level details. They will be kept but altered.
Hexagon is a stand alone 3D modeler, despite its texture creation tools and preview capabilities. In order to generate a final, photo-realistic render, you will need to export your textured 3D models to a rendering software (such as Carrara or any other rendering and animation product), which will allow you to set-up lighting and rendering parameters and to compute an image or an animation.
Below are listed the capabilities and considerations to export 3D detailed models created thanks to the surface displacement modeling tools of Hexagon.
Please refer as well to the 3D Import-Export section of the User Manual.
The easiest solution and the most “compatible” one for exporting your high-resolution models (which, inside Hexagon, contain dynamic information due to the multi-resolution smoothing), is to save all the geometric data. This will “flatten” the information, similar to how you can flatten/collapse layers in an image editing software. Except for the native Carrara file format, other 3D exchange formats do export the geometry this way.
The major issue with this solution is that if your model count is, as an example, 1 million polygons inside Hexagon thanks to the dynamic smoothing, the exported model will have 1 million polygons as well, but all statically embedded in the model. Few products easily handle so many polygons, especially if bones/rigging operations must be performed. This can slow down certain software/hardware configurations.
Please read about 3D models export for more information.
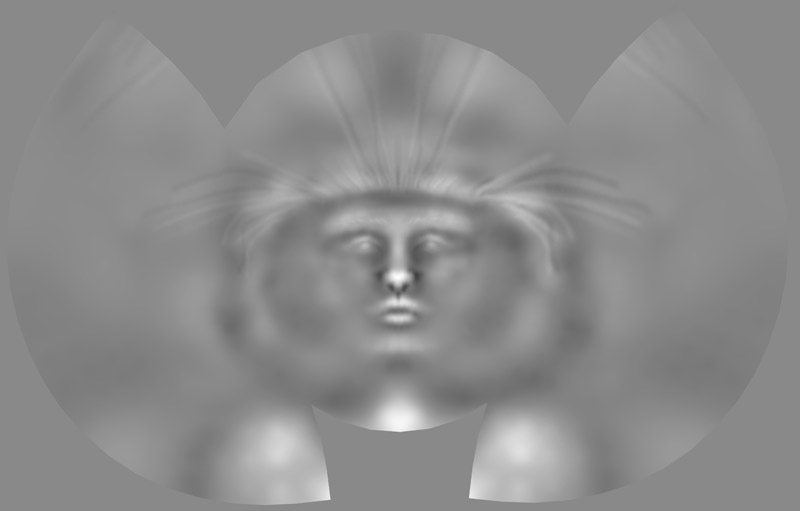
The most convenient and efficient solution is to export your model with no smoothing (control shape), and to ask Hexagon to generate a displacement texture. This displacement texture (or displacement map) is in fact a grey-level image, 16-bit encoded, corresponding to the difference of elevation (of displacement) between the control shape (the object with no smoothing) and the maximum level of smoothing that you used to sculpt the finest details.
Then, in your rendering software, you will just have to apply the displacement map in the corresponding material channel. This texture will “push” or “pull” the polygons at rendering time, thus re-creating the detailed relief. It will of course be absolutely mandatory to specify the same smoothing level used at the time of export in Hexagon.

A displacement texture example.
The main advantage of this rendering technique is to be able to work with a low-resolution model in your 3D rendering/animation software, and to generate only for each rendering frame the high-resolution model with all its details, thus making the assembly/rigging/animation process easier.
The main disadvantage is that the model is somehow re-generated. A slight loss of information may occur, if your control shape is not detailed enough. From a practical point of view, these result variations are barely noticeable most of the time. Another possible disadvantage is that each rendering software handles the displacement amplitude its own way. It is important, when first testing import and export of displacement textures between Hexagon and your 3D rendering software, to check the displacement map amplitude settings corresponding to your rendering software, and to use them afterwards.
Please read about Displacement Maps for more information.
Hexagon proposes to create embossing textures, more generally called bump maps, which simulates (but does not create) at display time an impression of relief. While this system is used a bit less now, because it is frequently replaced by displacement thanks to the recent graphics board performances, it has the big advantage of very fast computing, and generally suffices to create all very fine details of a model.
With Hexagon, it is possible to export all details painted using the bump channel as an image. But it is also possible to export geometric displacement information as bump map.
This second possibility is far less accurate than exporting the geometric displacement, but for objects far off in the scene, it could be more than enough.
Please read about Bump Textures for more information.
There is a last export solution allowing you to reduce rendering time in 3D products when you import objects and textures from Hexagon. Displacement generates at rendering time an important count of polygons, which can make rendering computations rather long.
The solution consists of exporting from Hexagon a displacement texture corresponding to a smoothing range “n”, and then a bump texture between this range “n” and the highest smoothing range (the highest level of detail).
In the previously mentioned example with the arm, which has a range-6 smoothing for the highest level where the veins and tendons are sculpted, it will be possible:
Visually, at rendering time, this trick will give a very realistic aspect to the rendered model, while saving two smoothing ranges, which is significant when they are approaching the range 5 and more.
Of course, on close-ups, the result will be less accurate than using a displacement texture encoding the whole geometric displacement from the control shape (range 0) and the highest modeling level (range 6).