Table of Contents
- Modeling With Symmetry
Many 3D models are symmetrical, such a car, a character, and more. To make the modeling process easier, Hexagon provides two ways to work in symmetry, each of them having its own advantages. “Modeling with symmetry” simply means that when you perform any operation on a model (such as moving vertices, extruding faces, and more), this operation is automatically applied in real time on the symmetrical part of the model, and in a symmetrical way (moving a vertex to the right will move the symmetrical vertex to the left, and so on).
It is important to note that, to model with symmetry, Hexagon provides a symmetry mode and a symmetry tool. The difference is essential: in the mode case the current object is updated, while in the tool case a new object is created.
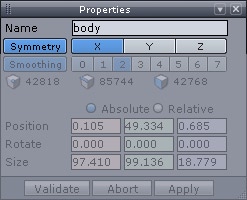
This mode, available in the object properties panel, allows you to choose a symmetry plane, based on the X, Y or Z axis.

The symmetry parameters in the object property panel.
Of course, this function works only if the object is already totally or partially symmetrical, a small tolerance value being applied. This plane is represented by a green rectangle. If the object is largely asymmetrical, this function will be deactivated.
If the object is symmetrical only on one plane, the symmetry is activated only on that plane. In case of an object having several symmetrical planes, if the plane activated by default is not the one you want just switch to the desired one by clicking in the X, Y or Z icons.
The symmetry mode can be deactivated at any time, turning the displayed Symmetry plane from green to grey. This can be useful to perform a specific operation that you do not want to be applied symmetrically. You will then be able to reactivate it, with Hexagon memorizing the symmetry plane.
Remark:

The symmetry tool options and the clone feature.
Contrary to the symmetry mode, the symmetry tool allows you to create a copy of the current object, according to a plane specified within the tool, and eventually with an offset.
By default, the symmetry tool creates a new object which is independent of the initial one. This means that when you perform an operation on the original model, this operation is not automatically applied to the mirror copy.
If you want to automatically apply changes to the mirror copy, a “Clone” option is available when creating the symmetrical object, allowing you to create a true mirror copy: any modification on one of the two mirrored object will be applied on the other one, up until the “clone” property is suppressed (either by welding the two parts together, or by suppressing this dynamic property through the dynamic geometry panel).
The two above capabilities share numerous similarities, but are very different. Below is a list of the respective pros and cons of the mode and the tool: