Sidebar
Adjust Auto Generated Morphs
Summary
You have an auto generated clothing morph that needs to be adjusted or fixed, and you want to replace it with a modified morph. We will outline the steps to complete this fix.
Process Overview
- Scale to 100%
- Fix morph in:
- the modeler
- or Use smoothing to fix the morph in DAZ Studio 4
- Replace the old morph with the fixed version
- Test
- Save
Foundation
Using a clothing item, like a cap as an example. When you dial the child morph the brim gets warped and broken. You aren't happy with this morph and need to replace it with a fixed version.
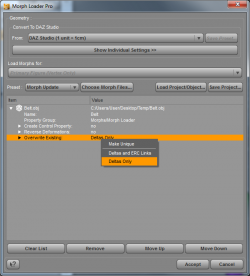
You can either fix the morph in your modeler or save the smoothed version and use that as your morph. When you reload the new morph into DAZ Studio with Morph Loader Pro..., use the Overwrite Existing: Deltas Only option and it will replace the old broken morph that studio generated with your fixed morph. Here's the workflow broken down into steps:
Step By Step
Step 1: Scale the Child Morph
In studio, scale the child up to 100 percent (this is necessary to get the cap to scale correctly with the child morph).
Step 2: Fix the Morph
There are two options here:
- 1- Fixing the morph in your Modeler:
- Export out the child morph at 100 % scale. (To be used for reference for cap fixes if you need it).
- Next export out the cap with the child morph dialed on. (The child morph should still be scaled to 100 percent).
- (Note : If your cap uses subdivision - make sure that the cap mesh resolution is set to Base resolution, and subdivision set to 0).
- Import these items into your modeler, make your fix to the cap, and export out the cap morph using the same name as the auto generated morph in studio.
- 2- Using Smoothing to Fix the Morph in Studio:
- Export out the cap only (with the child morph on), and with smoothing set on the cap at the number that you feel it's fixed (double check that the smoothing is turned on before you export out your cap). This will be your new fixed cap morph.
- If your clothing item uses subdivision, set the mesh resolution to Base, and subdivision level to 0.
- Export out the cap morph using the same name as the auto generated morph in studio.
Step 3: Overwrite the Deltas Only
 Using Morph Loader Pro, import in your fixed morph target, using the Overwrite Existing deltas only option. This will replace the broken auto generated morph with the fixed version.
Step 4: Test the Morph
Test the morph, and make sure the problem is resolved (sometimes you have to spin the child morph dial on the figure to reset the morphs and see the changes).
- If your item is Sub D, check carefully for poke through. Sometimes when Subdivision is applied to a modified morph, it may need to be adjusted out in some areas to compensate for the subdivision.
Step 5: Save the New Morph Target
Save your new fixed morph target, by either re-saving the cap again as a .dsf file, or you can choose just to save the child morph target out as a DSF morph file (which is the preferred method).
Wrap Up
Tip: Always work on the different character shapes with their scaling set to 100 percent. Your morph will develop scaling issues if you work on a character that has scaling set to anything but 100 percent.
